The startup disk is the primary disk that your Mac relies on during booting or restarting. This tutorial will guide you through the process of permanently changing the startup disk via System Settings or modifying it on a case-by-case basis, whether you have a Mac with Apple silicon or Intel processor.
Most people are content with booting their Mac straight into macOS, but certain multi-boot situations warrant choosing a different startup disk. But why would anyone in their right mind have multiple operating systems on their computer, you ask?
Well, if you like trying out new things before they’re available to everyone, chances are you keep the latest beta of macOS installed on a separate partition.
Besides, some people like yours truly prefer to keep a bootable USB thumb drive in a safe place for times when something terribly wrong goes with their Mac.
There are two ways to choose a startup disk. One involves choosing a boot disk via a System Settings pane called Startup Disk, and the other method involves picking a boot disk as your Mac is starting up.
What’s a startup disk?
A startup disk is a partition of a drive or a volume that contains a usable operating system. Your startup disk doesn’t have to contain macOS.
For example, your Mac can boot directly into Windows if you’re using Boot Camp. It can also boot into Ubuntu or any other operating system supported by your Mac’s hardware.
As mentioned before, you can, one, set your computer to automatically use a startup disk using System Preferences, and two, temporarily override this choice at boot time using Startup Manager.
What is Startup Manager?
Startup Manager is a built-in application that you can invoke during the startup process to pick a volume to boot your Mac from.
How to choose a startup disk at boot time
The process for selecting the startup disk is slightly different for Mac with Apple silicon (M1, M2, or its successors) and older models with an Intel processor.
On Mac with Apple silicon
- Shut down your Mac.
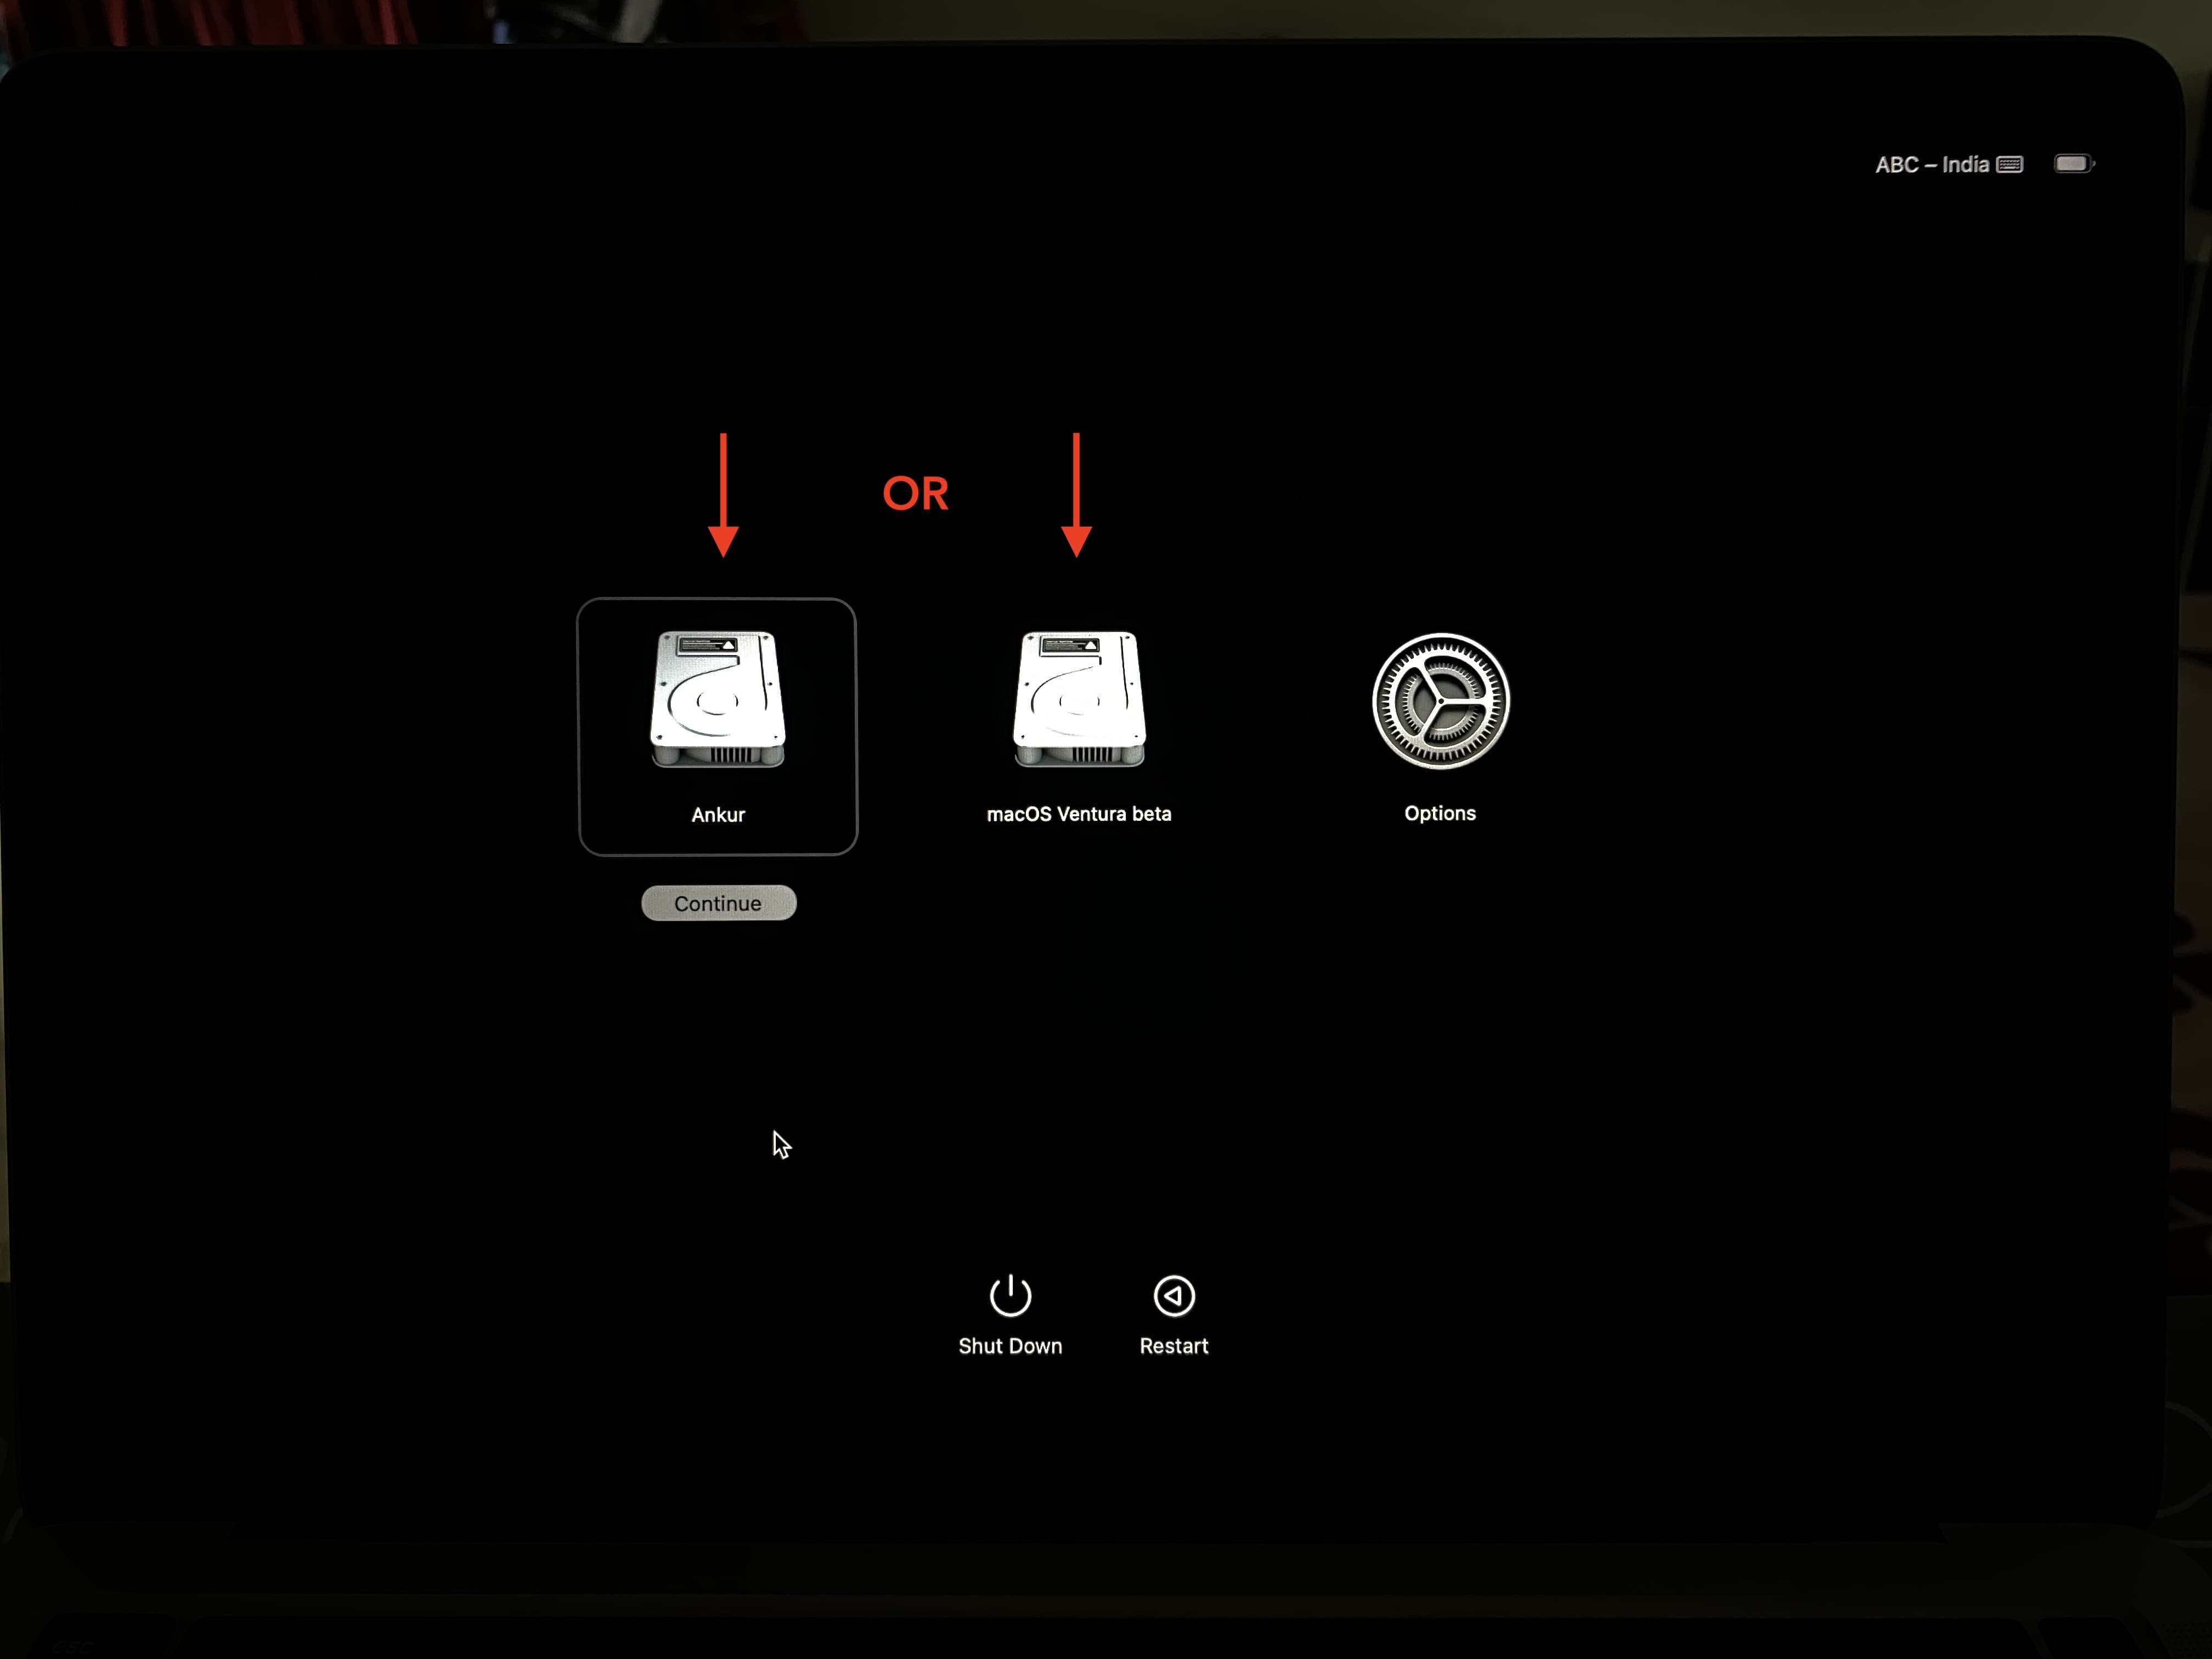
- With the machine turned off, press and hold the power button until you go past Continue holding for startup options and see Loading startup options. On an Apple silicon Mac mini, wait for the system indicator light to turn amber.
- Your Mac will scan all the disks attached to it. With the available startup disks displayed, select one and click Continue below it. The computer will restart using the newly selected startup disk.
Intel-based Macs
To pick a disk to start your Mac from while it’s booting, follow these simple steps for using macOS’ built-in feature called Startup Manager, which can be invoked via a simple keystroke.
1) Turn on your Mac by pressing the power button, or restart it if it’s already on by choosing Restart in the Apple menu .
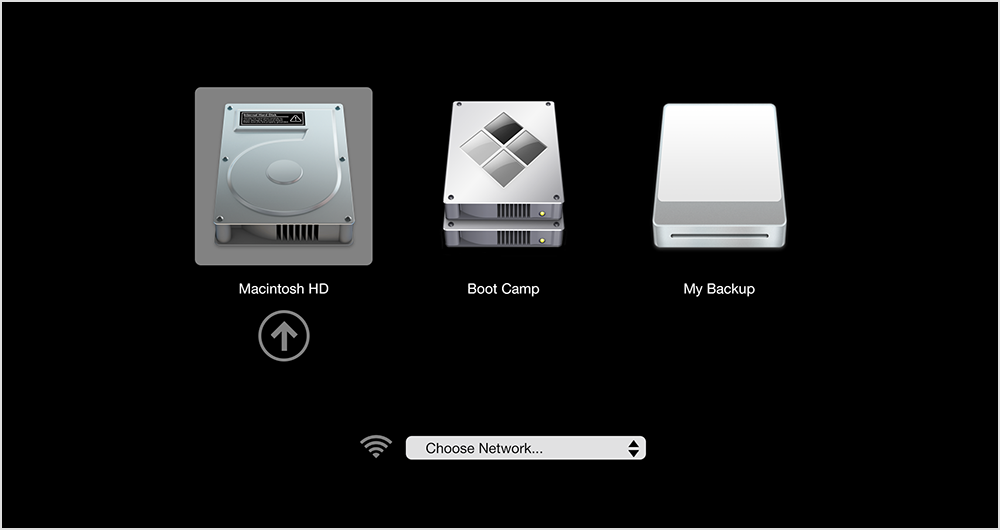
2) Press and hold the Option (⌥) key immediately upon hearing the startup chime and release the key after Startup Manager appears. Startup Manager will scan connected drives and will present drive icons of any volumes it finds, as shown below.
3) Highlight the volume you want to use by using your mouse or trackpad or left and right arrow keys. Keep in mind that your Mac can only start up from a disk containing an operating system.
4) Double-click or press the Return key to boot your Mac from the volume you just selected.
Tip: You can also attach external hard drives with an operating system: Startup Manager will automatically add bootable volumes as you connect them.
How to change your default startup disk
You can use System Settings or System Preferences to tell your Mac to automatically use a specific startup volume each time your restart or turn it on. In other words, you can use these steps to set the default startup disk for your computer.
From System Settings
Follow these steps if your Mac is on macOS Ventura, macOS Sonoma, or later:
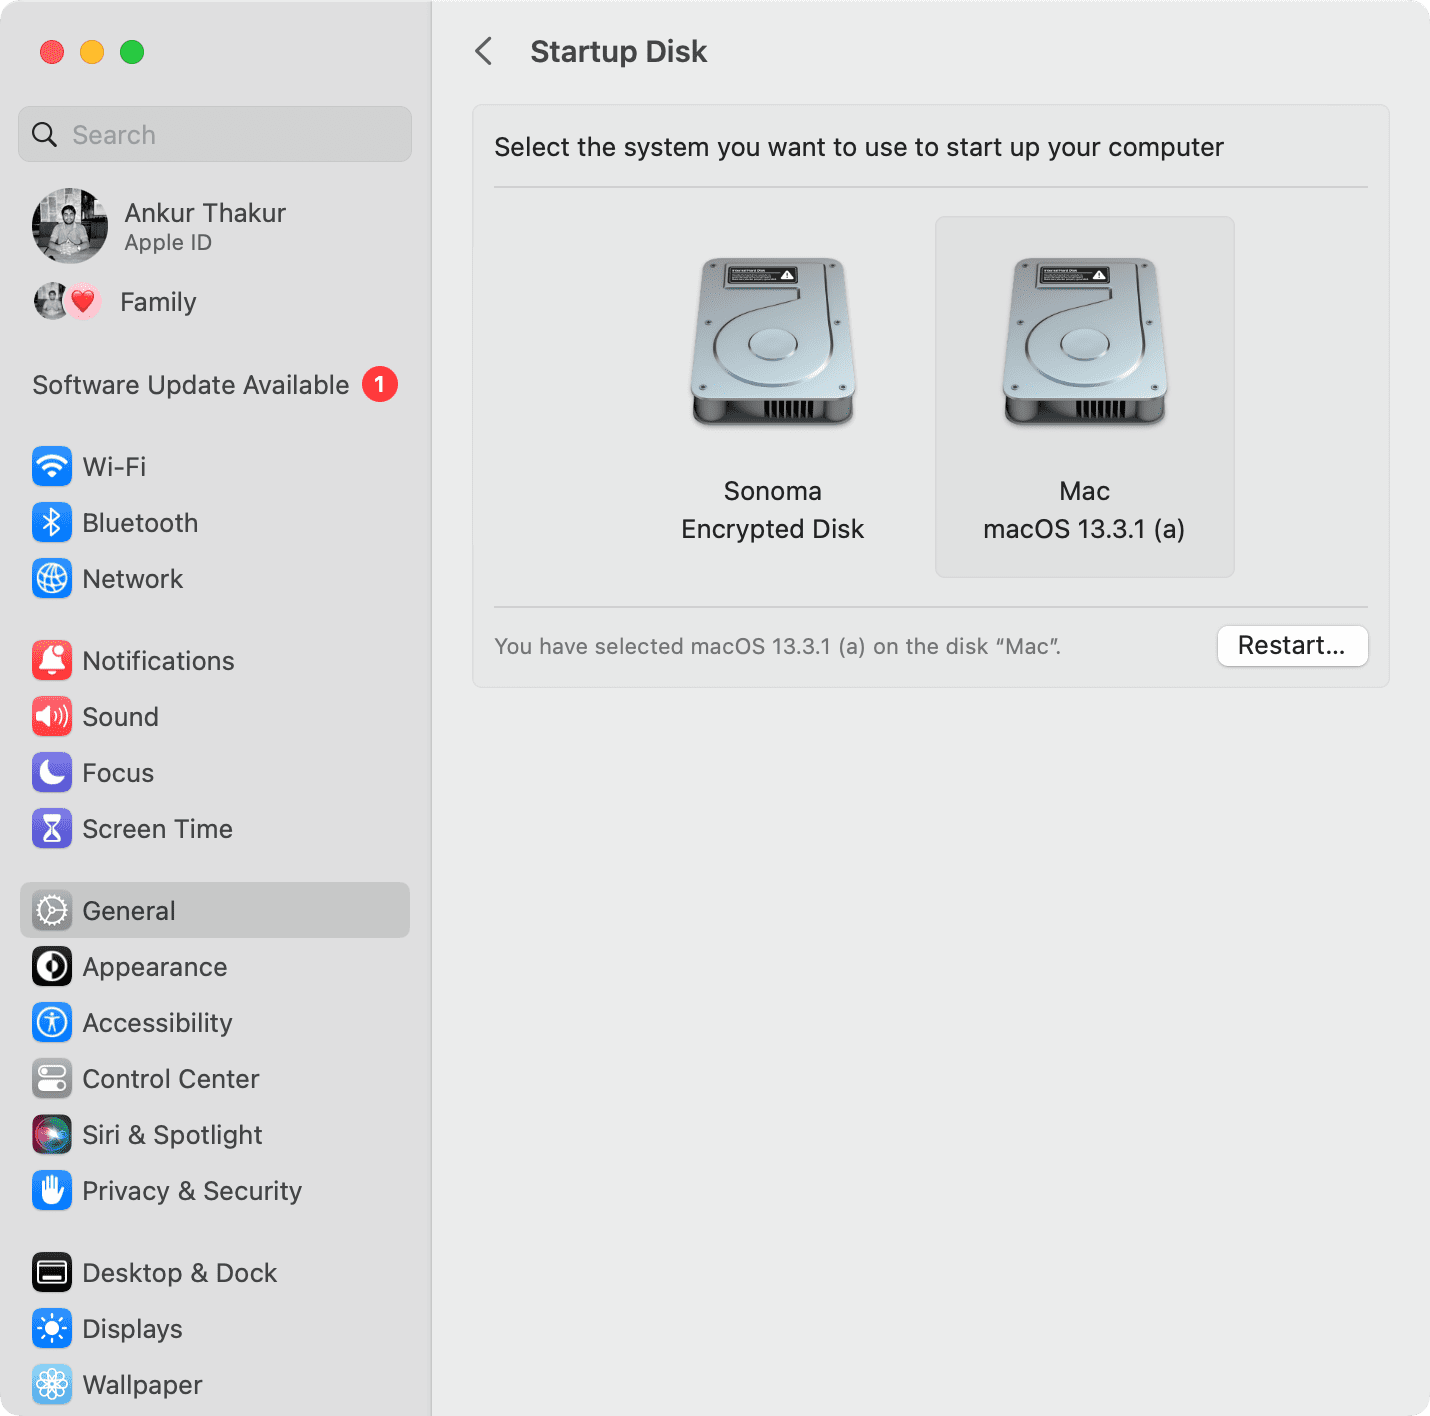
- Open System Settings and go to General > Startup Disk.
- Select the system/volume/disk you want to use as the default.
- Unlock it using your admin password if prompted.
- Finally, you can click Restart to finish the process.
From now on, when you press the power button, your Mac will start up using the volume you selected in Step 2 above.
From System Preferences
Here’s what you should do if your Mac is running macOS Monterey or earlier:
- Click and choose System Preferences.
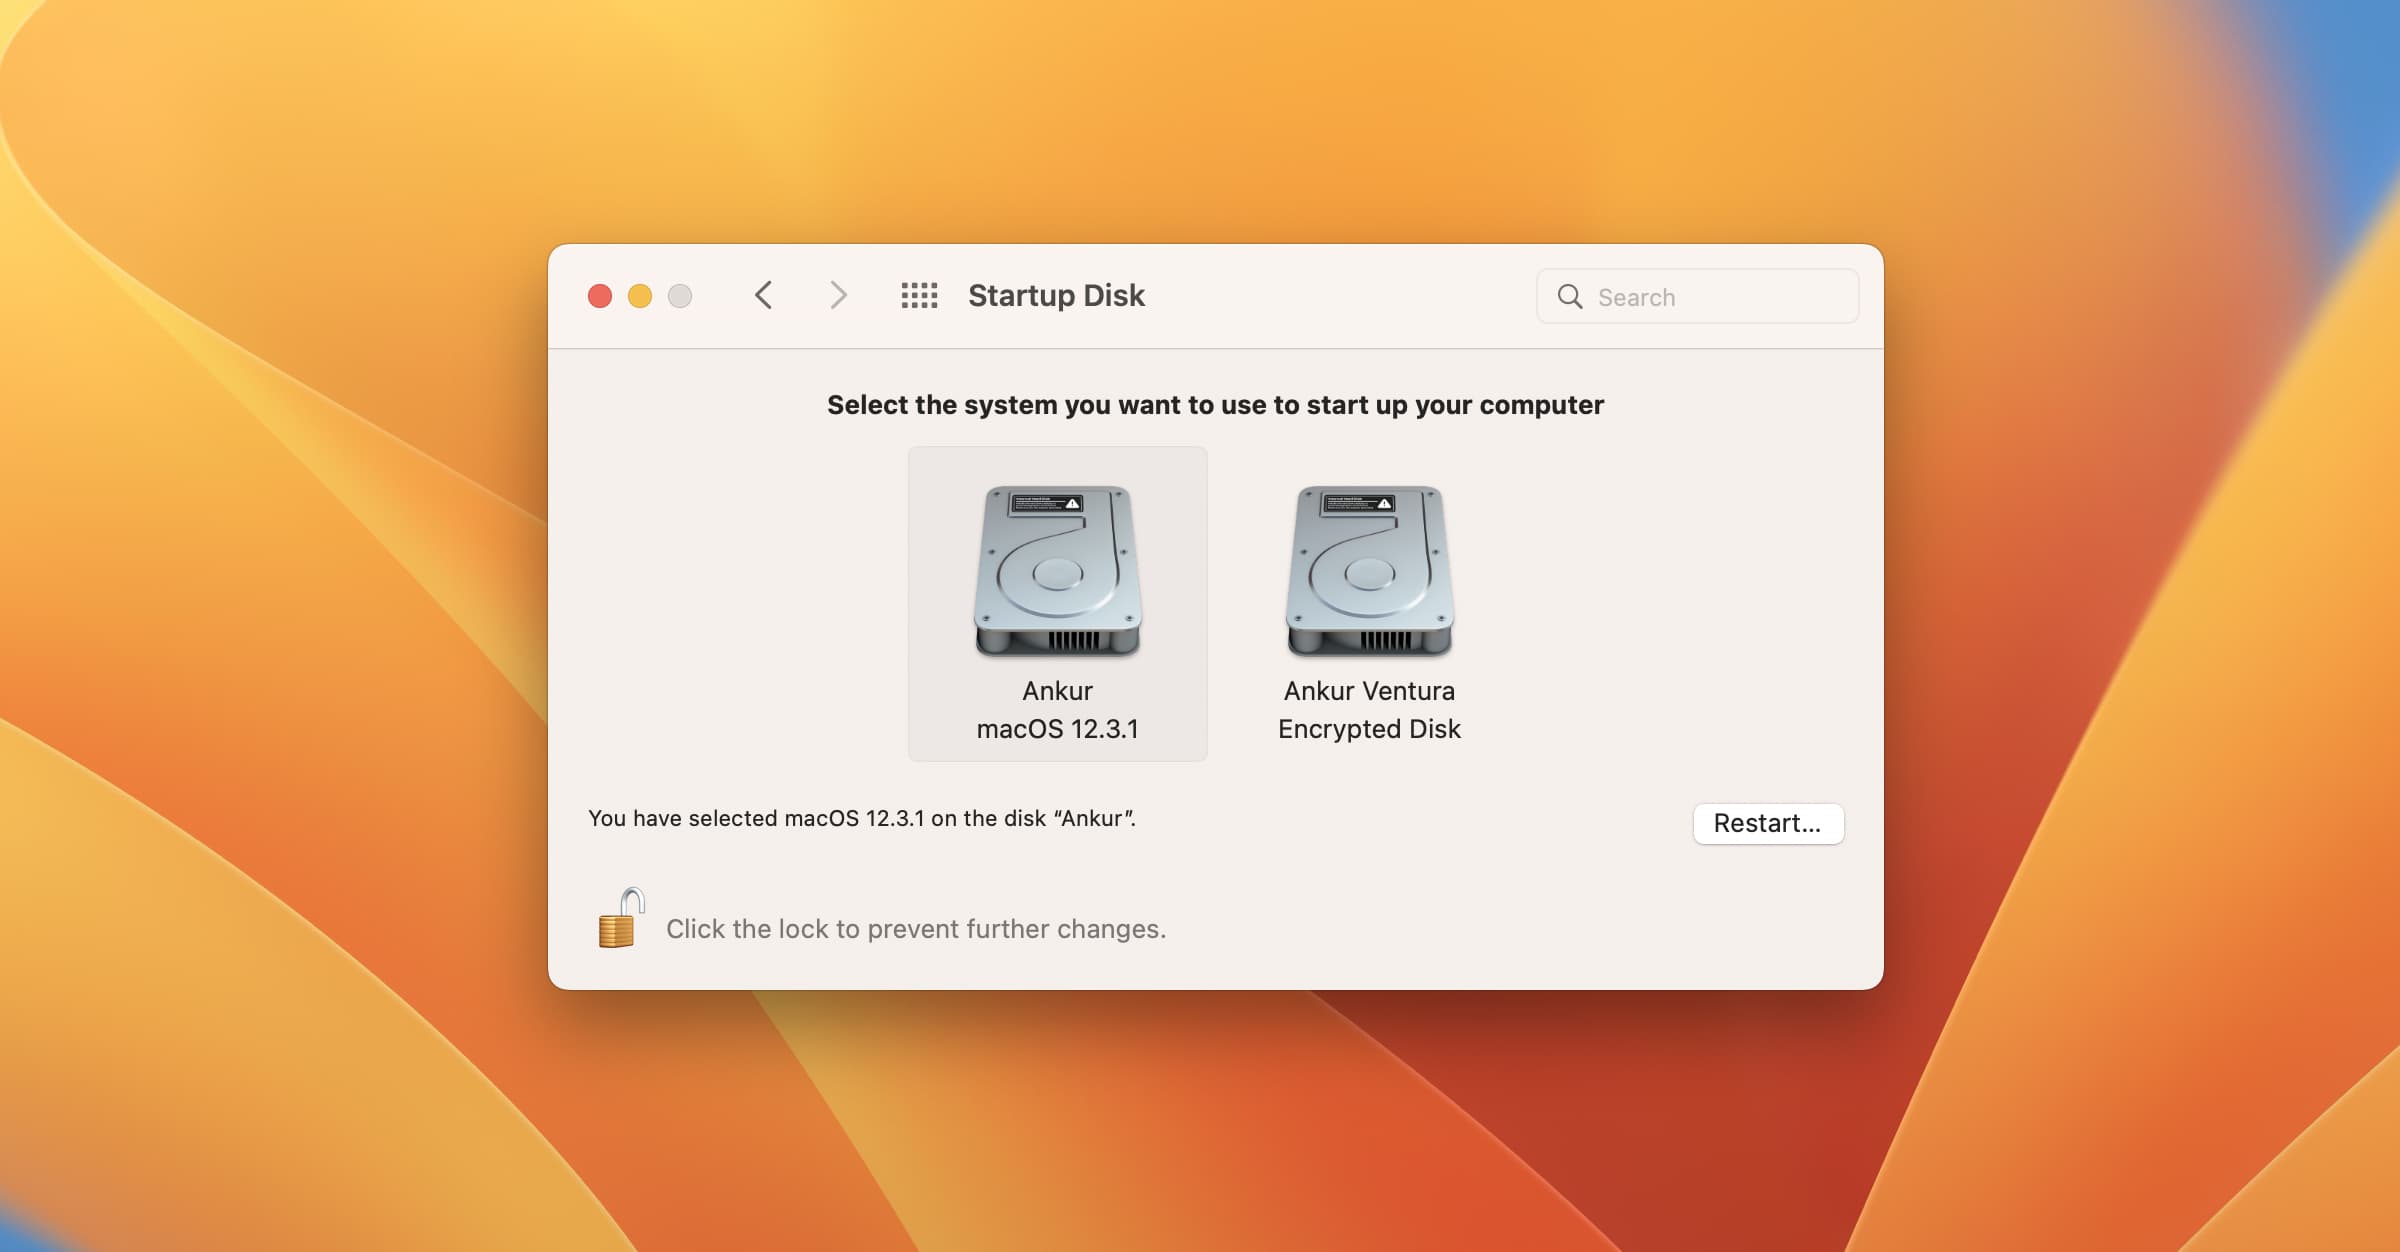
- Click Startup Disk.
- Click the lock at the bottom left to unlock the preference pane. Note: If a disk is encrypted, select and click Unlock. After that, follow step 4.
- Click the icon of the disk you want to use, then click Restart.
We also have a video explaining this process:
Startup Manager, System Settings, and Startup Disk
As explained before, choices you make via the Startup Disk pane in System Settings will stick until you choose another one or temporarily override these defaults at boot time in Startup Manager.
So when should you use Startup Manager over System Settings?
If you have two or more versions of macOS, you can go to the startup options screen using the above steps and pick an operating system to boot into.
Additionally, if you want your Mac to boot automatically into Windows every time it’s restarted or turned on, use System Preferences > Startup Disk. Want to boot into Windows, Ubuntu, or whatever, but just this one time, without changing your default startup disk? Use Startup Manager instead.

Startup Manager won’t let you select a startup disk?
If you cannot choose your startup disk in Startup Manager, make sure that it contains a bootable copy of an operating system such as macOS, Windows, or Linux.
Simply formatting a drive or partitioning a disk won’t cut it because Startup Manager looks for partitions and connected drives that contain a usable operating system.
If you’re interested in creating a dual-boot environment on your Mac, check out these easy-to-follow tutorials that cover deploying macOS on a separate volume and USB flash drive:
- How to install macOS Sonoma on a different partition of your Mac
- How to create a macOS Ventura volume partition on your Mac
- How to create a bootable USB installer for macOS Sonoma
- How to make a macOS Ventura USB installer
A note about Startup Security Utility
If you have an Intel-based Mac that’s equipped with Apple’s T2 security chip, you won’t be able to change the startup disk or boot into another operating system. Before you are able to do that, you will need to adjust your computer’s default security settings.
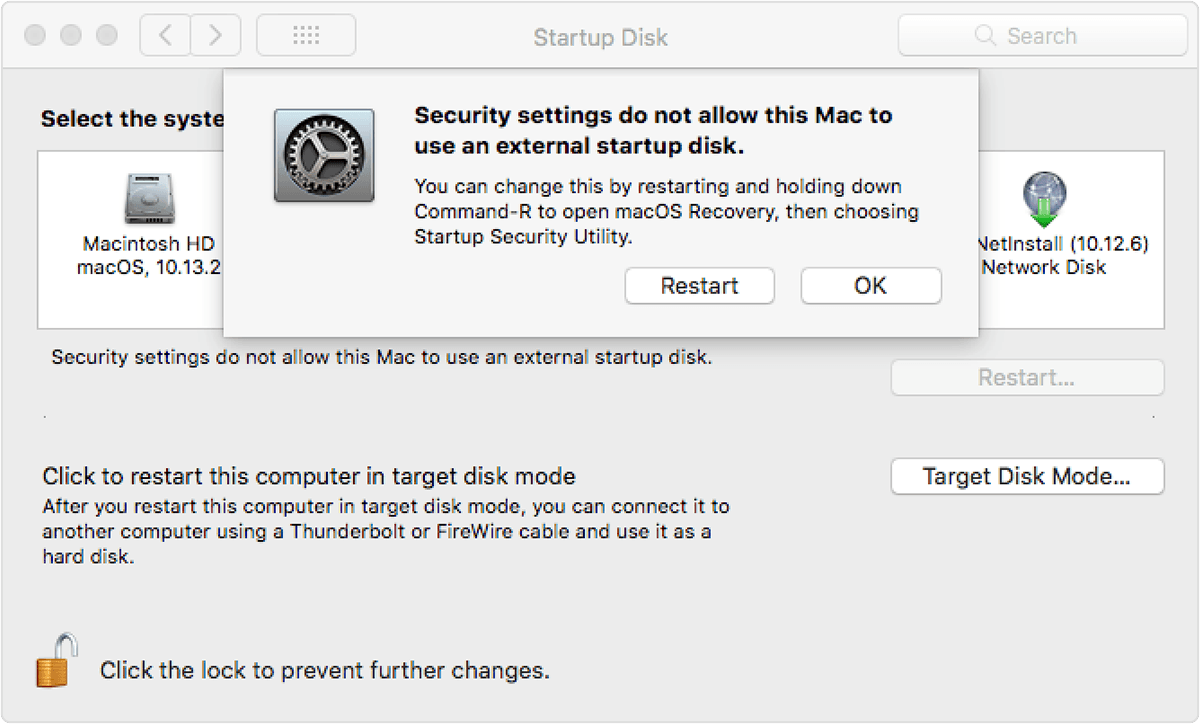
To change the boot volume on a Mac computer with an Apple T2 chip, you must first adjust its security settings using the Startup Security Utility. Start Security Utility is only available in macOS Recovery, which is the built-in recovery feature of your Mac.
- Turn on your Mac and hold down Command + R immediately after you see the Apple logo.
- Select the admin user you know the password for, click Next, and enter their password.
- In the macOS Utilities window, click the Utilities menu and choose Startup Security Utility.
- When asked to authenticate, click Enter macOS Password, then choose an administrator account and enter its password.
- Choose Medium Security underneath the heading Security.
- Click Allow booting from external media below the heading External Boot.
This is what the interface looks like.
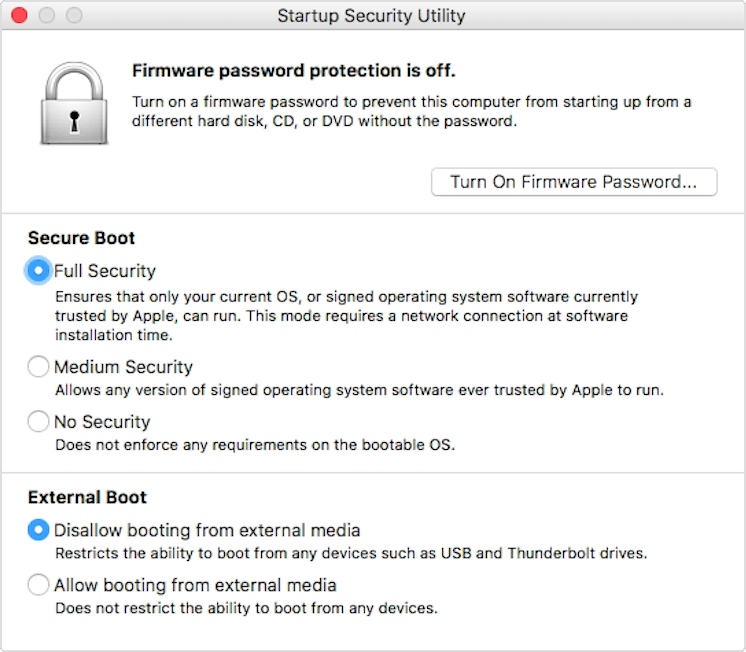
Choosing “Medium Security” allows operating system software that’s no longer signed by Apple to run on this computer. In a nutshell, selecting this option allows you to install an older version of macOS or Windows alongside your current macOS version for, say, app development or troubleshooting purposes. Allowing booting from external media lets your Mac boot from an external storage device, a USB thumb drive, an optical CD/DVD drive, or other external media.
A quick note for power users: To prevent anyone from starting up your computer from a disk other than your designated startup disk, simply set a firmware password in Startup Security Utility but make sure you write it down and keep it in a safe place.
Related: How to disable System Integrity Protection on your Mac
Here are the instructions for how to change the level of security used on the startup disk on your Apple silicon-powered Mac computer:
- Click the Apple menu on your Apple silicon Mac and choose Shut Down.
- Hold down the power button until Loading startup options appears.
- Click Options, then click Continue.
- If requested, enter the password for an administrator account.
- In the Recovery window, click the Utilities menu and choose Startup Security Utility.
- Select the system you want to use to set the security policy.
- If this is a FileVault disk, click Unlock, enter the password, and then click Unlock.
- Now click the option Security Policy, then choose Reduced Security.
- Click OK.
- Restart your Mac for the changes to take effect.
Selecting Reduced Security will permit older versions of your Apple operating system to run on this computer, even if it’s no longer signed by Apple. As for the Permissive Security option, this one should only be used if you know what you’re doing because it doesn’t enforce any requirements on the bootable operating system and, as such, poses a potential security risk.
The whole process is also detailed in a dedicated support document on Apple’s website.
Five common use cases for Startup Manager
There are many situations that warrant using Startup Manager. Here are some of the more obvious scenarios that average users might encounter:
1. Install an operating system from external media
If you’re old-school and your Mac has an optical drive connected to it, you can insert a disc containing an installer for macOS, Linux, Windows, or other supported operating systems and boot directly into the installer via Startup Manager. A usable operating system can also reside on a FireWire, Thunderbolt, or USB external drive. As long as the disk is bootable, it should show up in Startup Manager.
2. Temporarily override the default startup disk
As mentioned before, you should use Startup Manager to choose a startup disk for a single session, as it won’t permanently change your default startup disk selected in System Preferences. Let’s say Yosemite is your default startup disk, and you have El Capitan on another partition. You can use Startup Manager at boot time to temporarily override Yosemite and start up your computer straight into El Capitan.
3. Boot into other OS natively
Sometimes you may be wondering what’s life like on the “other side.”
In addition to running another operating system alongside macOS using virtualization software such as Parallels Desktop, it’s also possible to boot your Mac directly into a “foreign” operating system via Startup Manager. Typically, I would boot my Mac into Microsoft’s Windows 7 whenever I feel like playing that first-person Windows shooter that everyone’s talking about.
4. Software development and testing
People who develop software for a living typically have multiple instances of macOS to test their apps in multiple environments in order to ensure they run without a hiccup. In addition, many bloggers, journalists, and power users typically keep macOS betas separate from stable macOS releases. Startup Manager makes it ridiculously easy to choose between them at boot time.
5. Troubleshoot startup issues
Has your Mac been acting up lately?
An improper shutdown, forced restart, or power interruption can lead to file system errors that may prevent your computer from starting up. Choosing a different boot device is typically the first step in resolving common startup issues. And to be 100 percent on the safe side, I have another copy of macOS installed on a USB drive should something go terribly wrong with my Mac, and I’m in the middle of doing my work.
Other ways to start up your Mac
Your Mac can start up in a number of different ways, including the following methods that our tutorials provide step-by-step instructions for:
- Safe Mode: Safe Mode disables certain features of macOS and loads only essential components to make troubleshooting software issues simpler. In addition, Safe Mode includes an automatic disk check and repair, which might resolve boot problems and allow you to start up your computer successfully.
- Verbose Mode: Verbose Mode is a text-only environment that displays status messages as the startup process progresses. Use Verbose Mode to resolve issues with kernel extensions and custom hardware. If that doesn’t sound too sexy, you can enter Verbose Mode to see what’s going on behind the scenes and watch as macOS is loading its components.
Check out next: